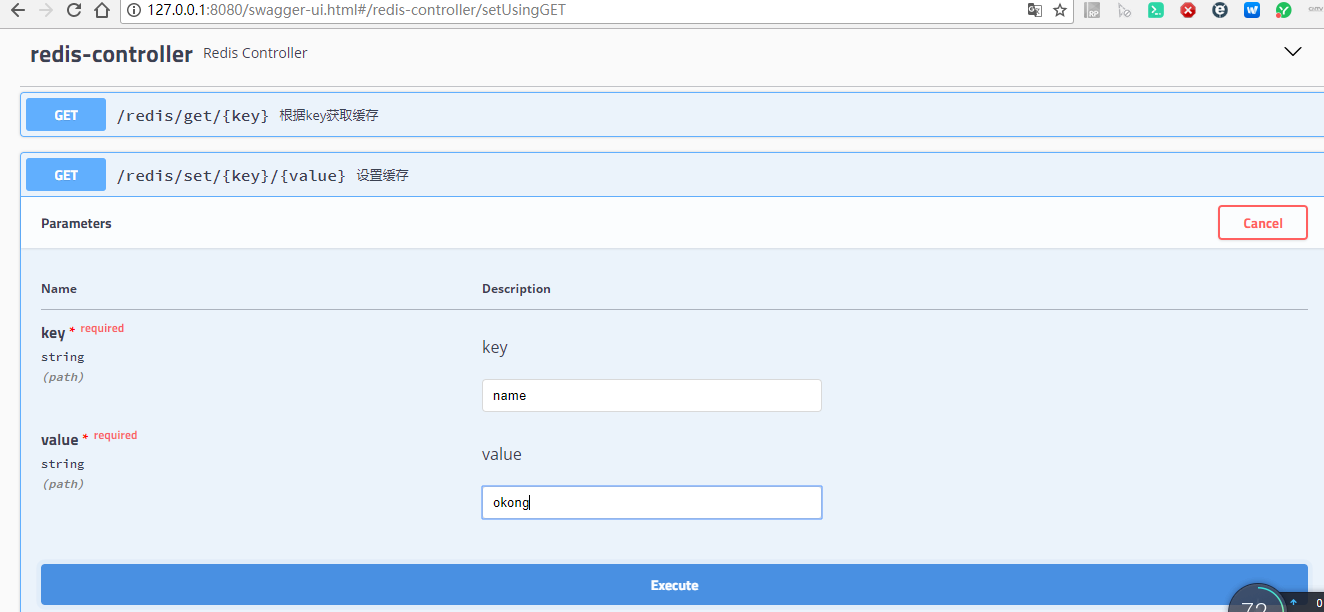
 set值
set值Redis 介绍上几节讲了利用Mybatis-Plus这个第三方的ORM框架进行数据库访问,在实际工作中,在存储一些非结构化或者缓存一些临时数据及热点数据时,一般上都会用上mongodb和redis进行这方面的需求。所以这一章节准备讲下缓存数据库Redis的集成,同时会介绍下基于Redis和注解驱动的Spring Cache的简单使用。
大家应该对Redis应该比较熟悉了。这几年也是大行其道的缓存数据库,目前的memcached由于使用场景及其存储数据结构的单一(不知道现在是否有改善,现在基本没有接触了),在工作中也使用的少了。引用官网的简介,Redis是一个开源的使用ANSI C语言编写、遵守BSD协议、支持网络、可基于内存亦可持久化的日志型、Key-Value数据库,并提供多种语言的API。
| 1 2 3 4 | <dependency> <groupId>org.springframework.boot</groupId> <artifactId>spring-boot-starter-data-redis</artifactId> </dependency> |
配置自动加载类为:org.springframework.boot.autoconfigure.data.redis.RedisProperties,可在属性文件中点击某属性快捷跳转。注意到其启动类为org.springframework.boot.autoconfigure.data.redis.RedisAutoConfiguration。这里就不介绍了,后面会写一篇关于Springboot自动加载配置的文章。
| 1 2 3 4 5 6 7 8 9 10 11 12 13 14 15 16 17 18 19 | # REDIS (RedisProperties) # Redis数据库索引(默认为0) spring.redis.database=0 # Redis服务器地址 spring.redis.host=127.0.0.1 # Redis服务器连接端口 spring.redis.port=6379 # Redis服务器连接密码(默认为空) spring.redis.password= # 连接池最大连接数(使用负值表示没有限制) spring.redis.pool.max-active=8 # 连接池最大阻塞等待时间(使用负值表示没有限制) spring.redis.pool.max-wait=-1 # 连接池中的最大空闲连接 spring.redis.pool.max-idle=8 # 连接池中的最小空闲连接 spring.redis.pool.min-idle=0 # 连接超时时间(毫秒) spring.redis.timeout=0 |
| 1 2 3 4 5 6 7 8 9 10 11 12 13 14 15 16 17 18 19 20 21 22 23 24 25 26 27 28 | /** * * @author oKong * */ @Configuration public class RedisConfig { /** * 定义 StringRedisTemplate ,指定序列化和反序列化的处理类 * @param factory * @return */ @Bean public RedisTemplate<String, String> redisTemplate(RedisConnectionFactory factory) { StringRedisTemplate template = new StringRedisTemplate(factory); Jackson2JsonRedisSerializer<Object> jackson2JsonRedisSerializer = new Jackson2JsonRedisSerializer<>( Object.class); ObjectMapper om = new ObjectMapper(); om.setVisibility(PropertyAccessor.ALL, JsonAutoDetect.Visibility.ANY); om.enableDefaultTyping(ObjectMapper.DefaultTyping.NON_FINAL); jackson2JsonRedisSerializer.setObjectMapper(om); //序列化 值时使用此序列化方法 template.setValueSerializer(jackson2JsonRedisSerializer); template.afterPropertiesSet(); return template; } } |
| 1 2 3 4 5 6 7 8 9 10 11 12 13 14 15 16 17 18 19 20 21 22 23 | @RestController @RequestMapping("/redis") @Api(tags = "redis 测试API") public class RedisController { @Autowired StringRedisTemplate redisTemplate; @GetMapping("set/{key}/{value}") @ApiOperation(value="设置缓存") public String set(@PathVariable("key")String key,@PathVariable("value") String value) { //注意这里的 key不能为null spring 内部有检验 redisTemplate.opsForValue().set(key, value); return key + "," + value; } @GetMapping("get/{key}") @ApiOperation(value="根据key获取缓存") public String get(@PathVariable("key") String key) { return "key=" + key + ",value=" + redisTemplate.opsForValue().get(key); } } |
set值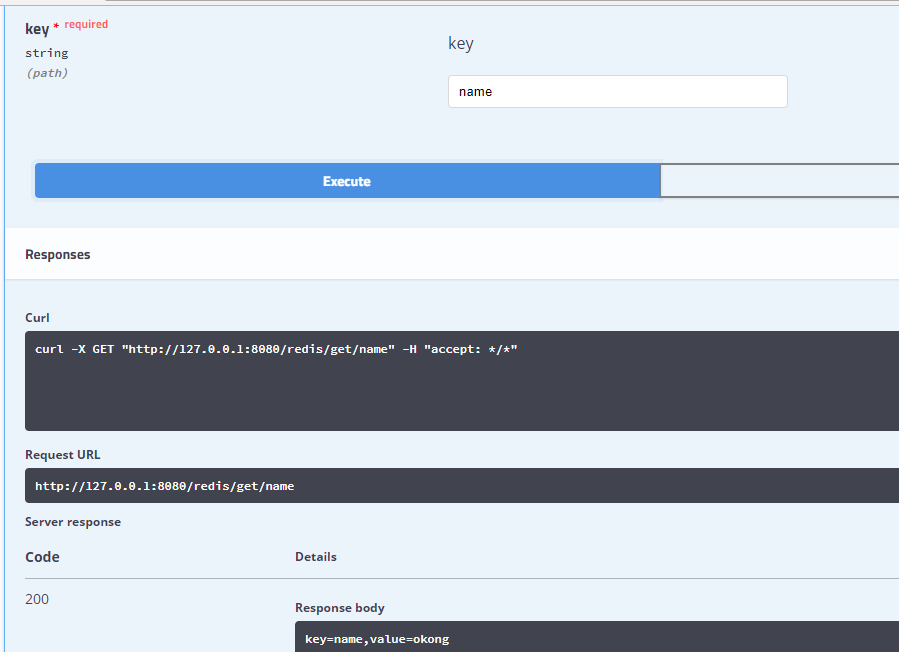 get值
get值

 redis记录
Spring Cache是Spring框架提供的对缓存使用的抽象类,支持多种缓存,比如Redis、EHCache等,集成很方便。同时提供了多种注解来简化缓存的使用,可对方法进行缓存。
| 1 2 3 4 5 6 7 8 9 10 11 12 13 14 15 16 17 18 19 20 21 22 23 24 25 26 27 28 29 30 31 32 33 34 35 36 37 38 39 40 41 | /** * * @author oKong * */ @Configuration @EnableCaching public class RedisConfig { /** * 定义 StringRedisTemplate ,指定序列号和反序列化的处理类 * @param factory * @return */ @Bean public RedisTemplate<String, String> redisTemplate(RedisConnectionFactory factory) { StringRedisTemplate template = new StringRedisTemplate(factory); Jackson2JsonRedisSerializer<Object> jackson2JsonRedisSerializer = new Jackson2JsonRedisSerializer<>( Object.class); ObjectMapper om = new ObjectMapper(); om.setVisibility(PropertyAccessor.ALL, JsonAutoDetect.Visibility.ANY); om.enableDefaultTyping(ObjectMapper.DefaultTyping.NON_FINAL); jackson2JsonRedisSerializer.setObjectMapper(om); //序列化 值时使用此序列化方法 template.setValueSerializer(jackson2JsonRedisSerializer); template.afterPropertiesSet(); return template; } @Bean public CacheManager cacheManager(RedisTemplate<String,String> redisTemplate) { RedisCacheManager rcm = new RedisCacheManager(redisTemplate); //使用前缀 rcm.setUsePrefix(true); //缓存分割符 默认为 ":" // rcm.setCachePrefix(new DefaultRedisCachePrefix(":")); //设置缓存过期时间 //rcm.setDefaultExpiration(60);//秒 return rcm; } } |
| 1 2 3 4 5 6 7 8 9 10 11 12 13 14 15 16 17 18 19 20 21 22 23 24 25 26 27 28 29 30 31 32 33 34 35 36 37 38 39 40 41 42 43 44 45 46 47 48 49 50 51 52 53 54 55 56 57 58 59 60 61 62 63 64 65 66 67 68 69 70 71 72 73 74 75 76 77 78 79 80 81 82 83 84 85 86 87 88 89 90 91 | /** * 用户控制层 简单演示增删改查及分页 * 新增了swagger文档内容 2018-07-21 * 新增了@caching使用 2018-07-23 * @author oKong * */ @RestController @RequestMapping("/user") @Api(tags="用户API") public class UserController { @Autowired IUserService userService; @PostMapping("add") @ApiOperation(value="用户新增") //正常业务时, 需要在user类里面进行事务控制,控制层一般不进行业务控制的。 //@Transactional(rollbackFor = Exception.class) public Map<String,String> addUser(@Valid @RequestBody UserReq userReq){ User user = new User(); user.setCode(userReq.getCode()); user.setName(userReq.getName()); //由于设置了主键策略 id可不用赋值 会自动生成 //user.setId(0L); userService.insert(user); Map<String,String> result = new HashMap<String,String>(); result.put("respCode", "01"); result.put("respMsg", "新增成功"); //事务测试 //System.out.println(1/0); return result; } @PostMapping("update") @ApiOperation(value="用户修改") //更新时 直接删除缓存 以保证下次获取时先从数据库中获取最新数据 @CacheEvict(value="OKONG", key="#userReq.id") public Map<String,String> updateUser(@Valid @RequestBody UserReq userReq){ if(userReq.getId() == null || "".equals(userReq.getId())) { throw new CommonException("0000", "更新时ID不能为空"); } User user = new User(); user.setCode(userReq.getCode()); user.setName(userReq.getName()); user.setId(Long.parseLong(userReq.getId())); userService.updateById(user); Map<String,String> result = new HashMap<String,String>(); result.put("respCode", "01"); result.put("respMsg", "更新成功"); return result; } @GetMapping("/get/{id}") @ApiOperation(value="用户查询(ID)") @ApiImplicitParam(name="id",value="查询ID",required=true) @Cacheable(value="OKONG",key="#id") public Map<String,Object> getUser(@PathVariable("id") String id){ //查询 User user = userService.selectById(id); if(user == null) { throw new CommonException("0001", "用户ID:" + id + ",未找到"); } UserResp resp = UserResp.builder() .id(user.getId().toString()) .code(user.getCode()) .name(user.getName()) .status(user.getStatus()) .build(); Map<String,Object> result = new HashMap<String,Object>(); result.put("respCode", "01"); result.put("respMsg", "成功"); result.put("data", resp); return result; } @GetMapping("/page") @ApiOperation(value="用户查询(分页)") public Map<String,Object> pageUser(int current, int size){ //分页 Page<User> page = new Page<>(current, size); Map<String,Object> result = new HashMap<String,Object>(); result.put("respCode", "01"); result.put("respMsg", "成功"); result.put("data", userService.selectPage(page)); return result; } } |
 第一次获取
第一次获取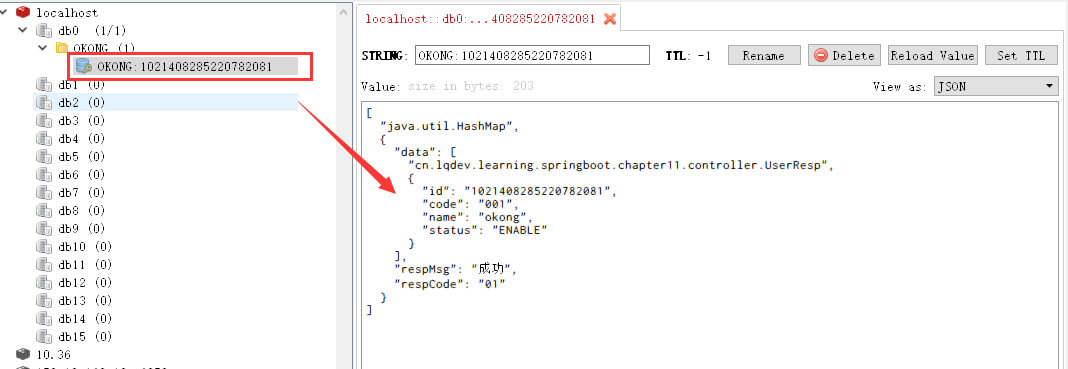 redis
redis 控制台
控制台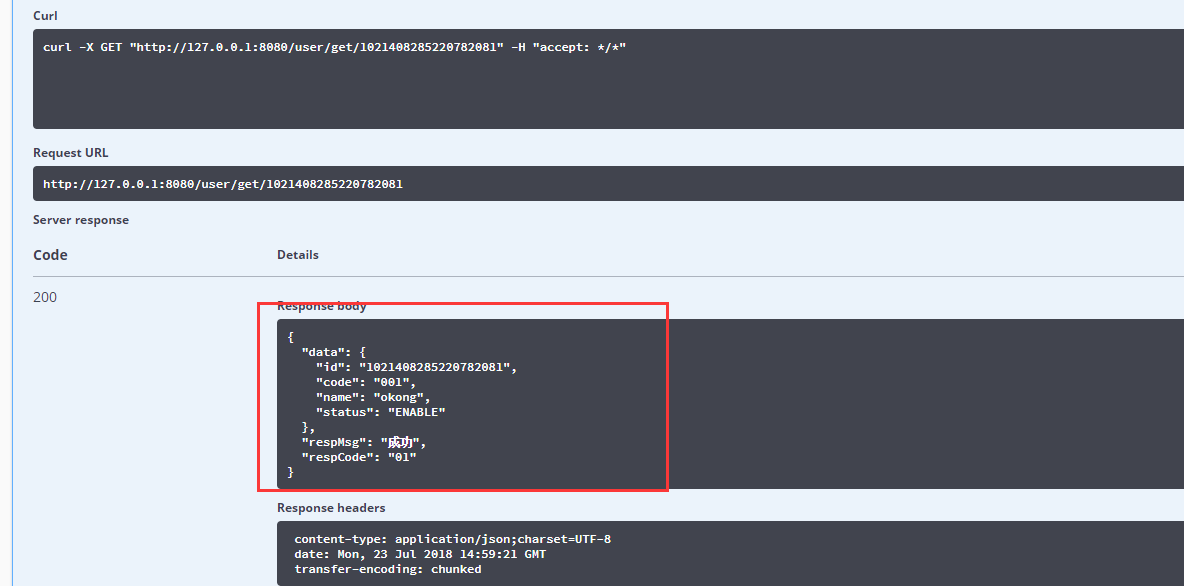
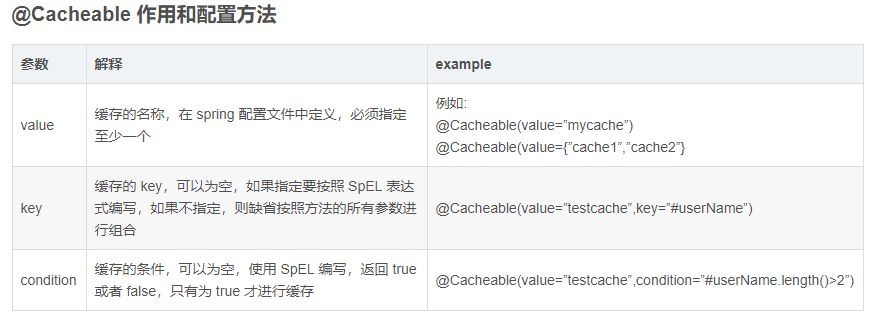
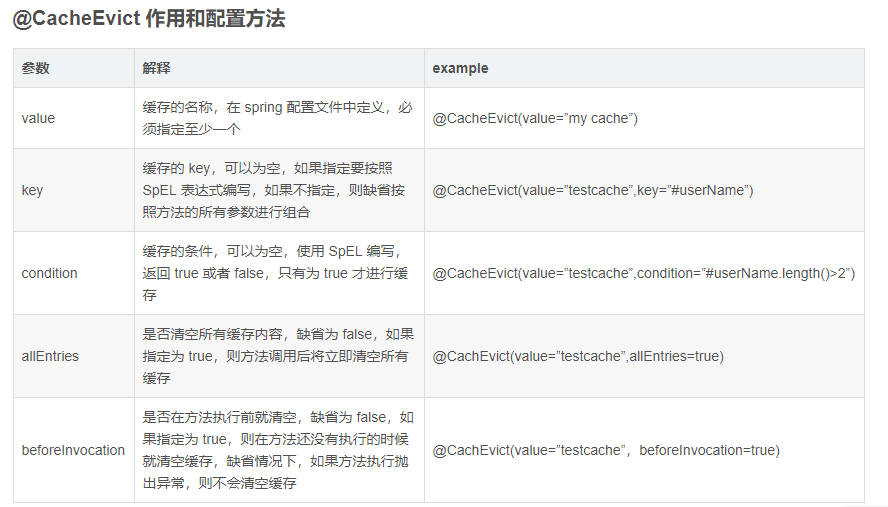

[td]Spring Cache提供了一些供我们使用的SpEL上下文数据,下表直接摘自互联网:
名称 | 位置 | 描述 | 示例 |
methodName | root对象 | 当前被调用的方法名 | root.methodName |
method | root对象 | 当前被调用的方法 | root.method.name |
target | root对象 | 当前被调用的目标对象 | root.target |
targetClass | root对象 | 当前被调用的目标对象类 | root.targetClass |
args | root对象 | 当前被调用的方法的参数列表 | root.args[0] |
caches | root对象 | 当前方法调用使用的缓存列表(如@Cacheable(value={“cache1”, “cache2”})),则有两个cache | root.caches[0].name |
argument name | 执行上下文 | 当前被调用的方法的参数,如findById(Long id),我们可以通过#id拿到参数 | user.id |
result | 执行上下文 | 方法执行后的返回值(仅当方法执行之后的判断有效,如‘unless’,’cache evict’的beforeInvocation=false) | result |
| 1 | @CacheEvict(value = "user", key = "#user.id", condition = "#root.target.canCache() and #root.caches[0].get(#user.id).get().username ne #user.username", beforeInvocation = true) public void conditionUpdate(User user) |
最后本章节主要是对redis结合Spring Cache的集成和简单使用进行了说明,详细的用法,可自行搜索相关资料下,这里就不阐述了。因为对于百分之八十之上的缓存要求基本能满足了。使用缓存时,一定要注意缓存生命周期的控制,不然容易出现数据不一致的情况,谨记!
转自 https://blog.lqdev.cn/2018/07/23/springboot/chapter-eleven/目前互联网上很多大佬都有SpringBoot系列教程,如有雷同,请多多包涵了。本文是作者在电脑前一字一句敲的,每一步都是实践的。若文中有所错误之处,还望提出,谢谢。
| 欢迎光临 黑马程序员技术交流社区 (http://bbs.itheima.com/) | 黑马程序员IT技术论坛 X3.2 |