黑马程序员技术交流社区
标题:
【上海校区】Hadoop分布式搭建
[打印本页]
作者:
不二晨
时间:
2018-9-28 09:41
标题:
【上海校区】Hadoop分布式搭建
1.准备虚假机,安装Linux
vmware12 ,centos 6.5
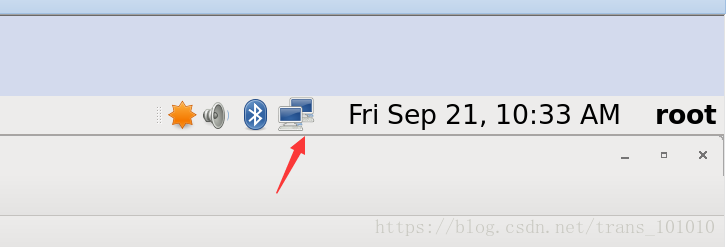
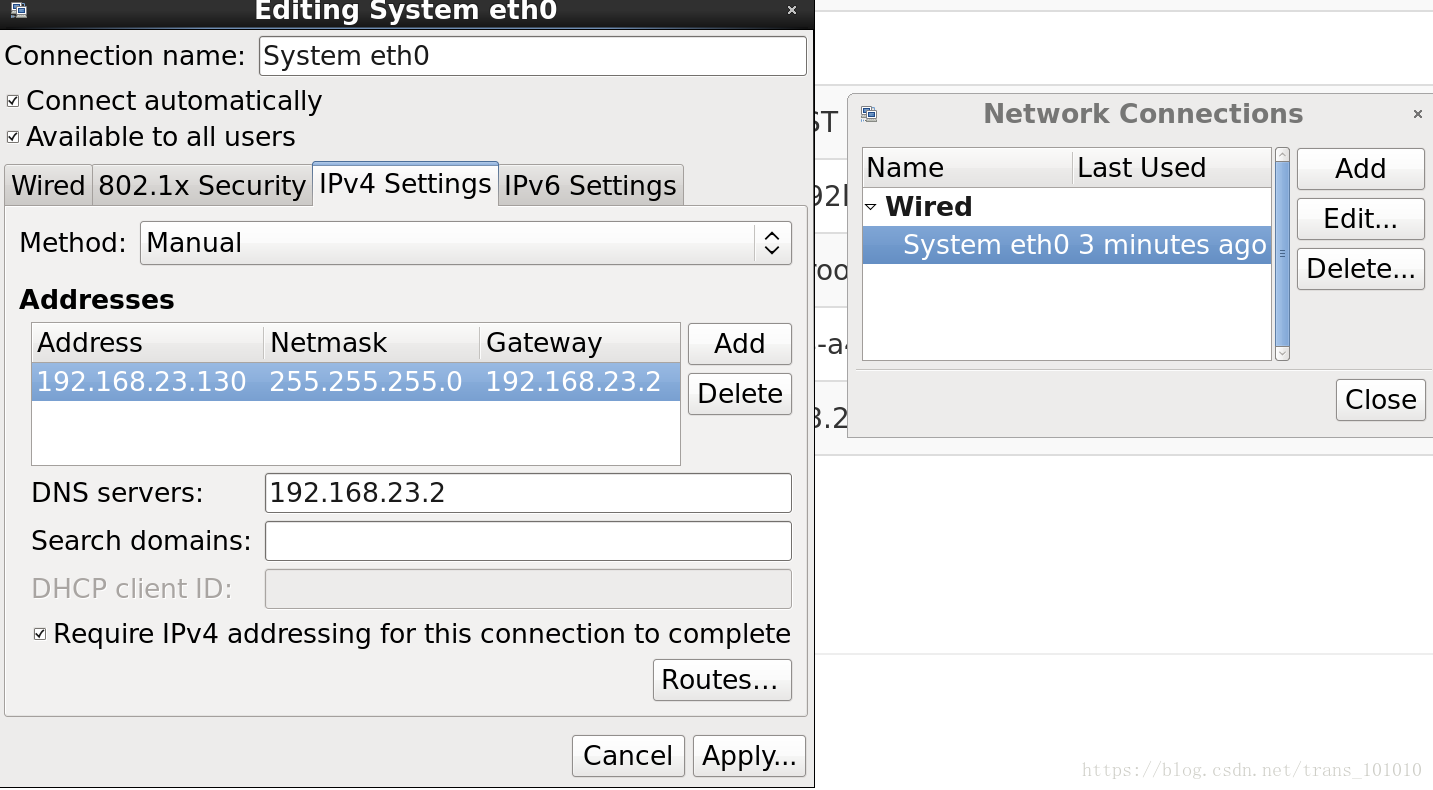
2.修改Ip 静态化
3.将zkpk账号添加到sudoers
(如果使用Root安装没有此步)
修改sudoers的权限
chmod u+w /etc/sudoers
vim /etc/sudoers
将zkpk添加到文件中
zkpk ALL=(ALL) ALL
4.修改 network
sudo vim /etc/sysconfig/network
修改如下内容并保存
NETWORKING=yes
HOSTNAME=master
5.修改hostname
sudo vim /etc/hosts
192.168.130.160 master
hostname master
6.关闭虚拟机的防火墙
service iptables stop
chkconfig iptables off
以上6步分在在5个节点上依次进行,节点全部准备好后,hosts文件内容应该如下
7.验证网络
分别在不同的节点上ping其他节点
8.免密登陆
分别在每个节点进行密钥生成与装载(以master为例)
ssh-keygen -t rsa(生成过程一直回车)
cd ~/.ssh
cp id_rsa_pub authorized_keys
相互分发密钥(以master为例)
cd ~/.ssh
ssh-copy-id -i slave1
ssh-copy-id -i slave2
ssh-copy-id -i slave3
ssh-copy-id -i slave4
验证效果
[root@master hadoop]# ssh slave1
Last login: Wed Sep 26 15:03:15 2018 from 192.168.23.1
9.安装并分发JDK
在master节点上做(注意使用root账号):
在xshell中使用rz命令(如果没有安装可以使用yum -y install lrzsz安装)传送JDK
mv jdk-8u111-linux-x64.tar.gz /usr/local
tar -zxvf jdk-8u111-linux-x64.tar.gz
rm jdk-8u111-linux-x64.tar.gz
vim ~/.bashrc
export JAVA_HOME=/usr/local/jdk1.8.0_111/
export PATH=$PATH:$JAVA_HOME/bin
source ~/.bashrc
分发JDK与.bashrc
scp -r /usr/local/jdk-8u111 root@slave1:/usr/local
scp -r /usr/local/jdk-8u111 root@slave2:/usr/local
scp -r /usr/local/jdk-8u111 root@slave3:/usr/local
scp -r /usr/local/jdk-8u111 root@slave4:/usr/local
scp ~/.bashrc root@slave1:~/
scp ~/.bashrc root@slave2:~/
scp ~/.bashrc root@slave3:~/
scp ~/.bashrc root@slave4:~/
在不同节上使环境变量生效
source ~/.bashrc
10.Zookeeper分布式安装
在master节点上做(注意使用root账号):
在xshell中使用rz命令(如果没有安装可以使用yum -y install lrzsz安装)传送zookeeper
mv zookeeper-3.4.9.tar.gz /usr/local
tar -zxvf zookeeper-3.4.9.tar.gz
rm zookeeper-3.4.9.tar.gz
将conf下的zoo_sample.cfg副本,改名为zoo.cfg
mv zoo_sample.cfg zoo.cfg
修改里边的dataDir修改成自己的目录 用于存放zookeeper的数据文件
dataDir=/usr/local/zookeeper/data/zData
修改节点
server.1=slave2:2888:3888
server.2=slave3:2888:3888
server.3=slave4:2888:3888
在slave2上的/usr/local/zookeeper/data/zData创建myid文件,内容是1(echo 1 >> myid)
分发到其他机器
scp -r /usr/local/zookeeper root@slave3:/usr/local
scp -r /usr/local/zookeeper root@slave4:/usr/local
在其它节点上修改myid文件 内容与Cfg文件对应,是2改成2,是3改成3
启动zookeeper (三台都要启动)
zkServer.sh start
jps查看进程,如果存在QuorumPeerMain表示启动成功
11.HDFS分布式安装
先在Master进行安装
在xshell中使用rz命令(如果没有安装可以使用yum -y install lrzsz安装)传送hadoop-2.7.3.tar.gz
mv hadoop-2.7.3.tar.gz /usr/local
tar -zxvf hadoop-2.7.3.tar.gz
mv hadoop-2.7.3 hadoop
rm hadoop-2.7.3.tar.gz
修改~/.bashrc
export HADOOP_HOME=/usr/local/hadoop/
export PATH=$PATH:$JAVA_HOME/bin:$HADOOP_HOME/bin:$HADOOP_HOME/sbin
使bashrc生效
source ~/.bashrc
配置Hdfs-site.xml
<?xml version="1.0" encoding="UTF-8"?>
<?xml-stylesheet type="text/xsl" href="configuration.xsl"?>
<!--
Licensed under the Apache License, Version 2.0 (the "License");
you may not use this file except in compliance with the License.
You may obtain a copy of the License at
http://www.apache.org/licenses/LICENSE-2.0
Unless required by applicable law or agreed to in writing, software
distributed under the License is distributed on an "AS IS" BASIS,
WITHOUT WARRANTIES OR CONDITIONS OF ANY KIND, either express or implied.
See the License for the specific language governing permissions and
limitations under the License. See accompanying LICENSE file.
-->
<!-- Put site-specific property overrides in this file. -->
<configuration>
<!--指定hdfs的nameservice为ns1,需要和core-site.xml中的保持一致 -->
<property>
<name>dfs.nameservices</name>
<value>ns1</value>
</property>
<!-- ns1下面有两个NameNode,分别是nn1,nn2 -->
<property>
<name>dfs.ha.namenodes.ns1</name>
<value>nn1,nn2</value>
</property>
<!-- nn1的RPC通信地址 -->
<property>
<name>dfs.namenode.rpc-address.ns1.nn1</name>
<value>master:9000</value>
</property>
<!-- nn1的http通信地址 -->
<property>
<name>dfs.namenode.http-address.ns1.nn1</name>
<value>master:50070</value>
</property>
<!-- nn2的RPC通信地址 -->
<property>
<name>dfs.namenode.rpc-address.ns1.nn2</name>
<value>slave1:9000</value>
</property>
<!-- nn2的http通信地址 -->
<property>
<name>dfs.namenode.http-address.ns1.nn2</name>
<value>slave1:50070</value>
</property>
<!-- 指定NameNode的元数据在JournalNode上的存放位置 -->
<property>
<name>dfs.namenode.shared.edits.dir</name>
<value>qjournal://slave2:8485;slave3:8485;slave4:8485/ns1</value>
</property>
<!-- 指定JournalNode在本地磁盘存放数据的位置 -->
<property>
<name>dfs.journalnode.edits.dir</name>
<value>/usr/local/hadoop/journaldata</value>
</property>
<!-- 开启NameNode失败自动切换 -->
<property>
<name>dfs.ha.automatic-failover.enabled</name>
<value>true</value>
</property>
<!-- 配置失败自动切换实现方式 -->
<property>
<name>dfs.client.failover.proxy.provider.ns1</name>
<value>org.apache.hadoop.hdfs.server.namenode.ha.ConfiguredFailoverProxyProvider</value>
</property>
<!-- 配置隔离机制方法,多个机制用换行分割,即每个机制暂用一行-->
<property>
<name>dfs.ha.fencing.methods</name>
<value>
sshfence
shell(/bin/true)
</value>
</property>
<!-- 使用sshfence隔离机制时需要ssh免登陆 -->
<property>
<name>dfs.ha.fencing.ssh.private-key-files</name>
<value>/root/.ssh/id_rsa</value>
</property>
<!-- 配置sshfence隔离机制超时时间 -->
<property>
<name>dfs.ha.fencing.ssh.connect-timeout</name>
<value>30000</value>
</property>
</configuration>
配置core-site.xml
<?xml version="1.0" encoding="UTF-8"?>
<?xml-stylesheet type="text/xsl" href="configuration.xsl"?>
<!--
Licensed under the Apache License, Version 2.0 (the "License");
you may not use this file except in compliance with the License.
You may obtain a copy of the License at
http://www.apache.org/licenses/LICENSE-2.0
Unless required by applicable law or agreed to in writing, software
distributed under the License is distributed on an "AS IS" BASIS,
WITHOUT WARRANTIES OR CONDITIONS OF ANY KIND, either express or implied.
See the License for the specific language governing permissions and
limitations under the License. See accompanying LICENSE file.
-->
<!-- Put site-specific property overrides in this file. -->
<configuration>
<!-- 指定hdfs的nameservice为ns1 -->
<property>
<name>fs.defaultFS</name>
<value>hdfs://ns1/</value>
</property>
<!-- 指定hadoop临时目录 -->
<property>
<name>hadoop.tmp.dir</name>
<value>/usr/local/hadoop/data/tmp</value>
</property>
<!-- 指定zookeeper地址 -->
<property>
<name>ha.zookeeper.quorum</name>
<value>slave2:2181,slave3:2181,slave4:2181</value>
</property>
</configuration>
配置yarn-site.xml
<?xml version="1.0"?>
<configuration>
<!--rm失联后重新链接的时间-->
<property>
<name>yarn.resourcemanager.connect.retry-interval.ms</name>
<value>2000</value>
</property>
<!--开启resourcemanagerHA,默认为false-->
<property>
<name>yarn.resourcemanager.ha.enabled</name>
<value>true</value>
</property>
<!--配置resourcemanager-->
<property>
<name>yarn.resourcemanager.ha.rm-ids</name>
<value>rm1,rm2</value>
</property>
<property>
<name>ha.zookeeper.quorum</name>
<value>slave2:2181,slave3:2181,slave4:2181</value>
</property>
<!--开启故障自动切换-->
<property>
<name>yarn.resourcemanager.ha.automatic-failover.enabled</name>
<value>true</value>
</property>
<property>
<name>yarn.resourcemanager.hostname.rm1</name>
<value>master</value>
</property>
<property>
<name>yarn.resourcemanager.hostname.rm2</name>
<value>slave1</value>
</property>
<!--
在hadoop001上配置rm1,在hadoop002上配置rm2,
注意:一般都喜欢把配置好的文件远程复制到其它机器上,但这个在YARN的另一个机器上一定要修改
-->
<property>
<name>yarn.resourcemanager.ha.id</name>
<value>rm1</value>
<description>If we want to launch more than one RM in single node,we need this configuration</description>
</property>
<!--开启自动恢复功能-->
<property>
<name>yarn.resourcemanager.recovery.enabled</name>
<value>true</value>
</property>
<!--配置与zookeeper的连接地址-->
<property>
<name>yarn.resourcemanager.zk-state-store.address</name>
<value>slave2:2181,slave3:2181,slave4:2181</value>
</property>
<property>
<name>yarn.resourcemanager.store.class</name>
<value>org.apache.hadoop.yarn.server.resourcemanager.recovery.ZKRMStateStore</value>
</property>
<property>
<name>yarn.resourcemanager.zk-address</name>
<value>slave2:2181,slave3:2181,slave4:2181</value>
</property>
<property>
<name>yarn.resourcemanager.cluster-id</name>
<value>appcluster-yarn</value>
</property>
<!--schelduler失联等待连接时间-->
<property>
<name>yarn.app.mapreduce.am.scheduler.connection.wait.interval-ms</name>
<value>5000</value>
</property>
<!--配置rm1-->
<property>
<name>yarn.resourcemanager.address.rm1</name>
<value>master:8032</value>
</property>
<property>
<name>yarn.resourcemanager.scheduler.address.rm1</name>
<value>master:8030</value>
</property>
<property>
<name>yarn.resourcemanager.webapp.address.rm1</name>
<value>master:8088</value>
</property>
<property>
<name>yarn.resourcemanager.resource-tracker.address.rm1</name>
<value>master:8031</value>
</property>
<property>
<name>yarn.resourcemanager.admin.address.rm1</name>
<value>master:8033</value>
</property>
<property>
<name>yarn.resourcemanager.ha.admin.address.rm1</name>
<value>master:23142</value>
</property>
<!--配置rm2-->
<property>
<name>yarn.resourcemanager.address.rm2</name>
<value>slave1:8032</value>
</property>
<property>
<name>yarn.resourcemanager.scheduler.address.rm2</name>
<value>slave1:8030</value>
</property>
<property>
<name>yarn.resourcemanager.webapp.address.rm2</name>
<value>slave1:8088</value>
</property>
<property>
<name>yarn.resourcemanager.resource-tracker.address.rm2</name>
<value>slave1:8031</value>
</property>
<property>
<name>yarn.resourcemanager.admin.address.rm2</name>
<value>slave1:8033</value>
</property>
<property>
<name>yarn.resourcemanager.ha.admin.address.rm2</name>
<value>hadoop002:23142</value>
</property>
<property>
<name>yarn.nodemanager.aux-services</name>
<value>mapreduce_shuffle</value>
</property>
<property>
<name>yarn.nodemanager.aux-services.mapreduce.shuffle.class</name>
<value>org.apache.hadoop.mapred.ShuffleHandler</value>
</property>
<property>
<name>mapreduce.shuffle.port</name>
<value>23080</value>
</property>
<!--故障处理类-->
<property>
<name>yarn.client.failover-proxy-provider</name>
<value>org.apache.hadoop.yarn.client.ConfiguredRMFailoverProxyProvider</value>
</property>
<property>
<name>yarn.resourcemanager.ha.automatic-failover.zk-base-path</name>
<value>/yarn-leader-election</value>
<description>Optionalsetting.Thedefaultvalueis/yarn-leader-election</description>
</property>
</configuration>
配置mapred-site.xml
<?xml version="1.0"?>
<?xml-stylesheet type="text/xsl" href="configuration.xsl"?>
<!--
Licensed under the Apache License, Version 2.0 (the "License");
you may not use this file except in compliance with the License.
You may obtain a copy of the License at
http://www.apache.org/licenses/LICENSE-2.0
Unless required by applicable law or agreed to in writing, software
distributed under the License is distributed on an "AS IS" BASIS,
WITHOUT WARRANTIES OR CONDITIONS OF ANY KIND, either express or implied.
See the License for the specific language governing permissions and
limitations under the License. See accompanying LICENSE file.
-->
<!-- Put site-specific property overrides in this file. -->
<configuration>
<!-- 指定mr框架为yarn方式 -->
<property>
<name>mapreduce.framework.name</name>
<value>yarn</value>
</property>
</configuration>
修改slaves
slave2
slave3
slave4
将Hadoop目录下的所有文件分发到其他节点上
scp -r /usr/lcoal/hadoop root@slave1:/usr/local
scp -r /usr/lcoal/hadoop root@slave2:/usr/local
scp -r /usr/lcoal/hadoop root@slave3:/usr/local
scp -r /usr/lcoal/hadoop root@slave4:/usr/local
将~/.bashrc分发到其他节点上,并在不同的节点上使用source ~/.bashrc ,使其生效
scp -r ~/.bashrc root@slave1:~
scp -r ~/.bashrc root@slave2:~
scp -r ~/.bashrc root@slave3:~
scp -r ~/.bashrc root@slave4:~
12.启动集群
在slave2,slave3,slave4上启动Zookeeper
zkServer.sh start
在slave2,slave3,slave4上启动journalnode
hadoop-daemon.sh start journalnode
以上两步完成后的进程如下(slave2,slave3,slave4都一样)
11216 Jps
9616 JournalNode
7902 QuorumPeerMain
格式化hdfs(master进行)
hdfs namenode -format
格式化ZKFC(master进行)
hdfs zkfc -formatZK
启动namenode(master和slave1)
hadoop-daemon.sh start namenode
在slave1上同步Namenode数据
hdfs namenode -bootstrapStandby
在master启动HDFS,YARN
start-dfs.sh
start-yarn.sh
在slave1记动redourcemanager
yarn-daemon.sh start resourcemanager
注意 准备好以后可以使用start-all.sh系统会按配置文件在不同的节点启动相应的进程
[root@master hadoop]# start-all.sh
This script is Deprecated. Instead use start-dfs.sh and start-yarn.sh
Starting namenodes on [master slave1]
master: starting namenode, logging to /usr/local/hadoop/logs/hadoop-root-namenode-master.out
slave1: starting namenode, logging to /usr/local/hadoop/logs/hadoop-root-namenode-slave1.out
slave4: starting datanode, logging to /usr/local/hadoop/logs/hadoop-root-datanode-slave4.out
slave3: starting datanode, logging to /usr/local/hadoop/logs/hadoop-root-datanode-slave3.out
slave2: starting datanode, logging to /usr/local/hadoop/logs/hadoop-root-datanode-slave2.out
Starting journal nodes [slave2 slave3 slave4]
slave3: starting journalnode, logging to /usr/local/hadoop/logs/hadoop-root-journalnode-slave3.out
slave2: starting journalnode, logging to /usr/local/hadoop/logs/hadoop-root-journalnode-slave2.out
slave4: starting journalnode, logging to /usr/local/hadoop/logs/hadoop-root-journalnode-slave4.out
Starting ZK Failover Controllers on NN hosts [master slave1]
slave1: starting zkfc, logging to /usr/local/hadoop/logs/hadoop-root-zkfc-slave1.out
master: starting zkfc, logging to /usr/local/hadoop/logs/hadoop-root-zkfc-master.out
starting yarn daemons
starting resourcemanager, logging to /usr/local/hadoop/logs/yarn-root-resourcemanager-master.out
slave3: starting nodemanager, logging to /usr/local/hadoop/logs/yarn-root-nodemanager-slave3.out
slave2: starting nodemanager, logging to /usr/local/hadoop/logs/yarn-root-nodemanager-slave2.out
slave4: starting nodemanager, logging to /usr/local/hadoop/logs/yarn-root-nodemanager-slave4.out
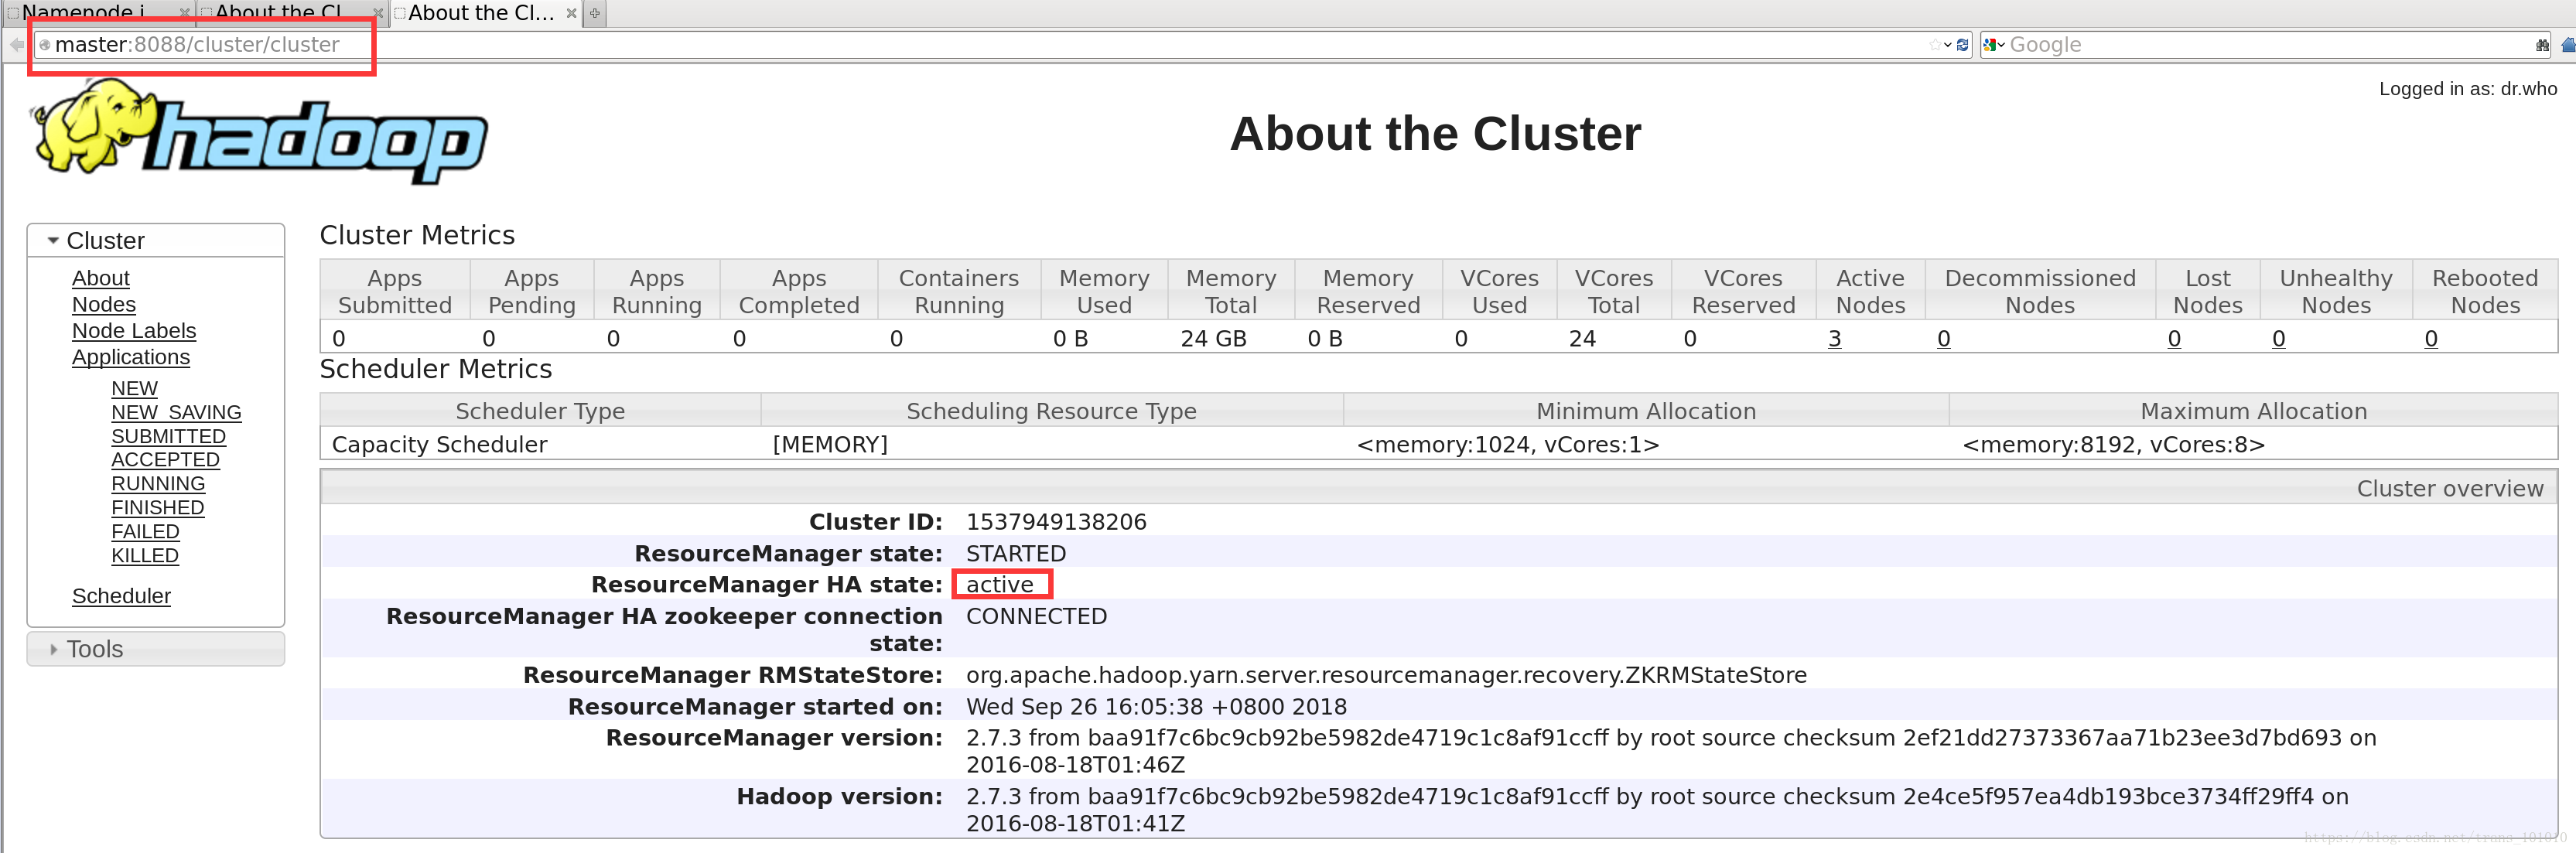
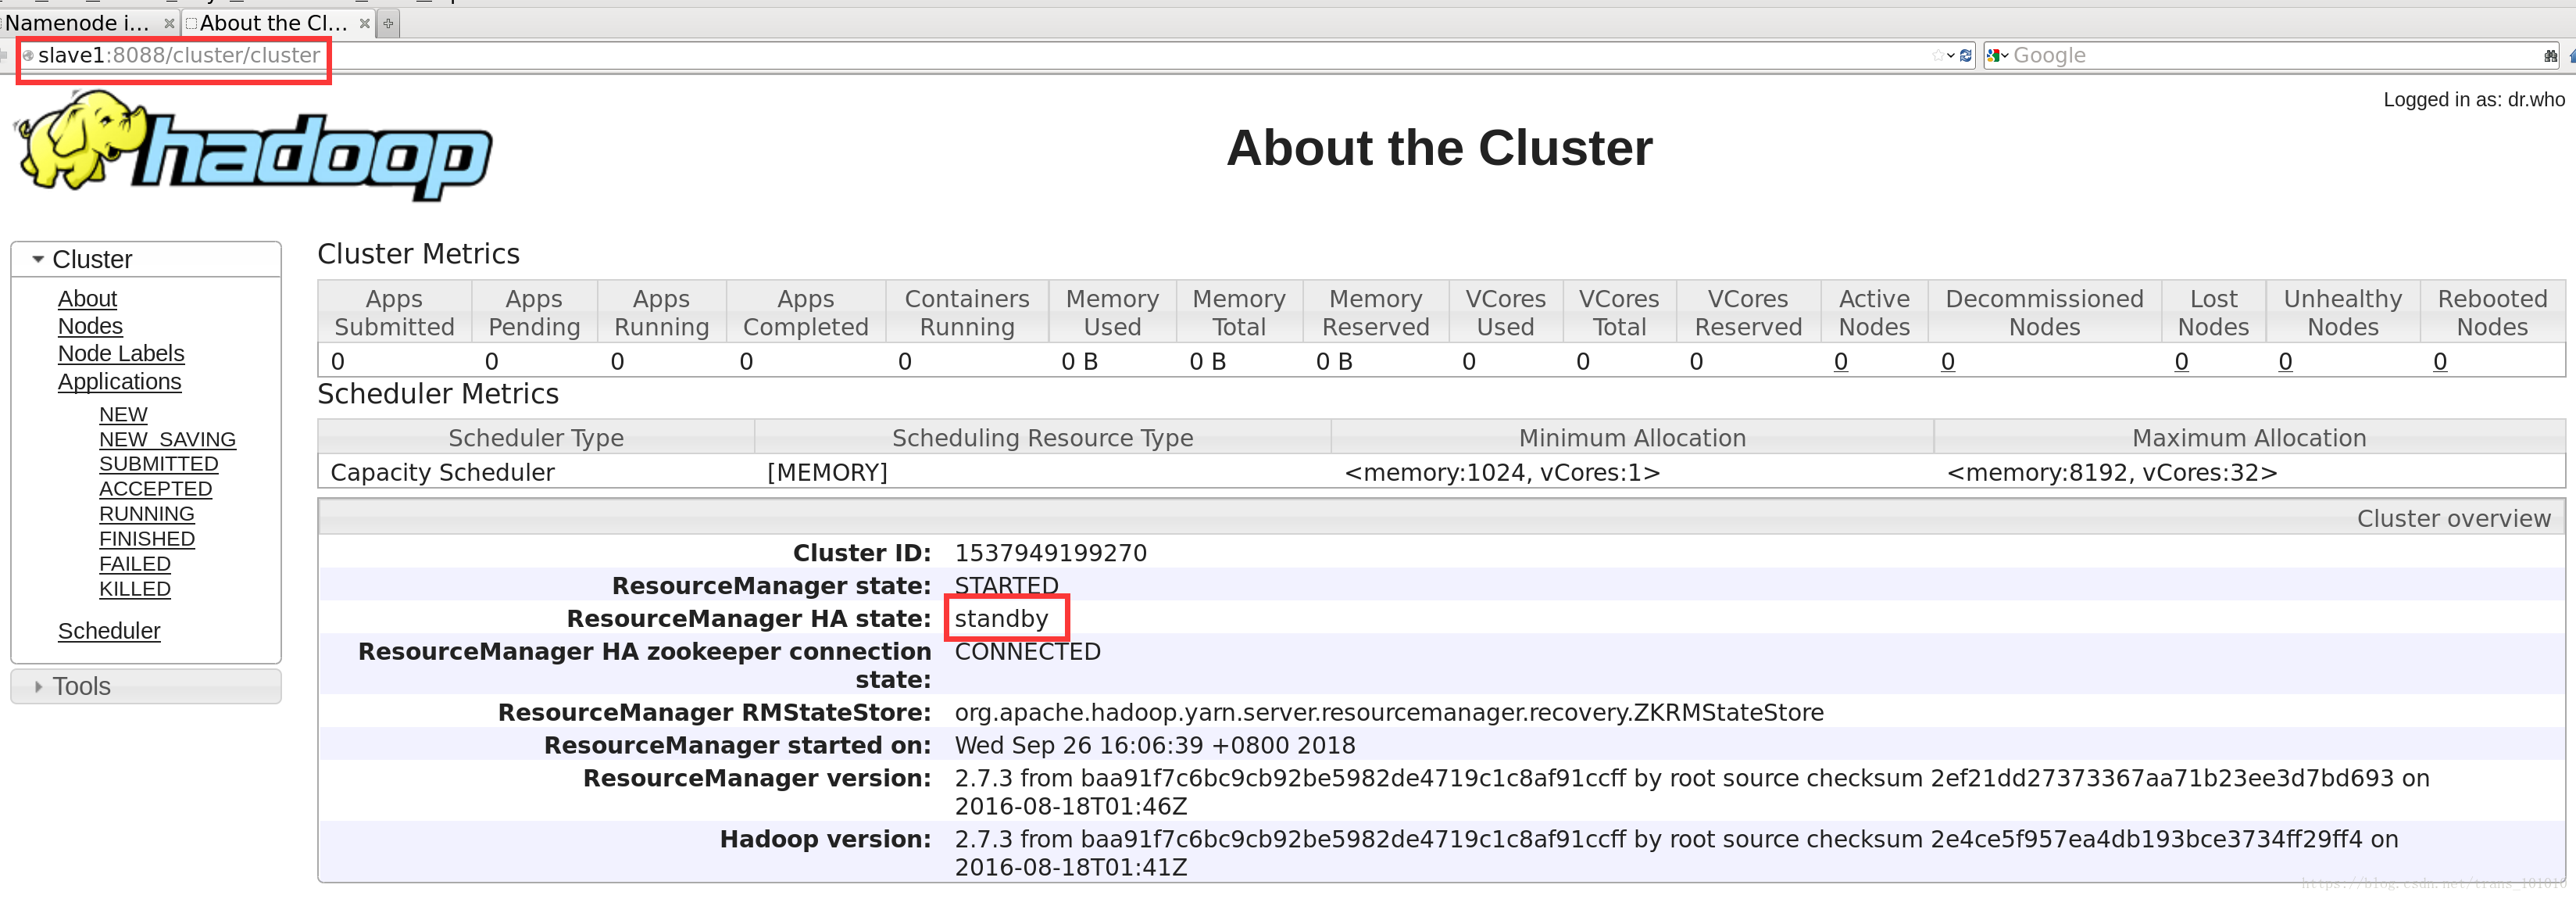
13.验证
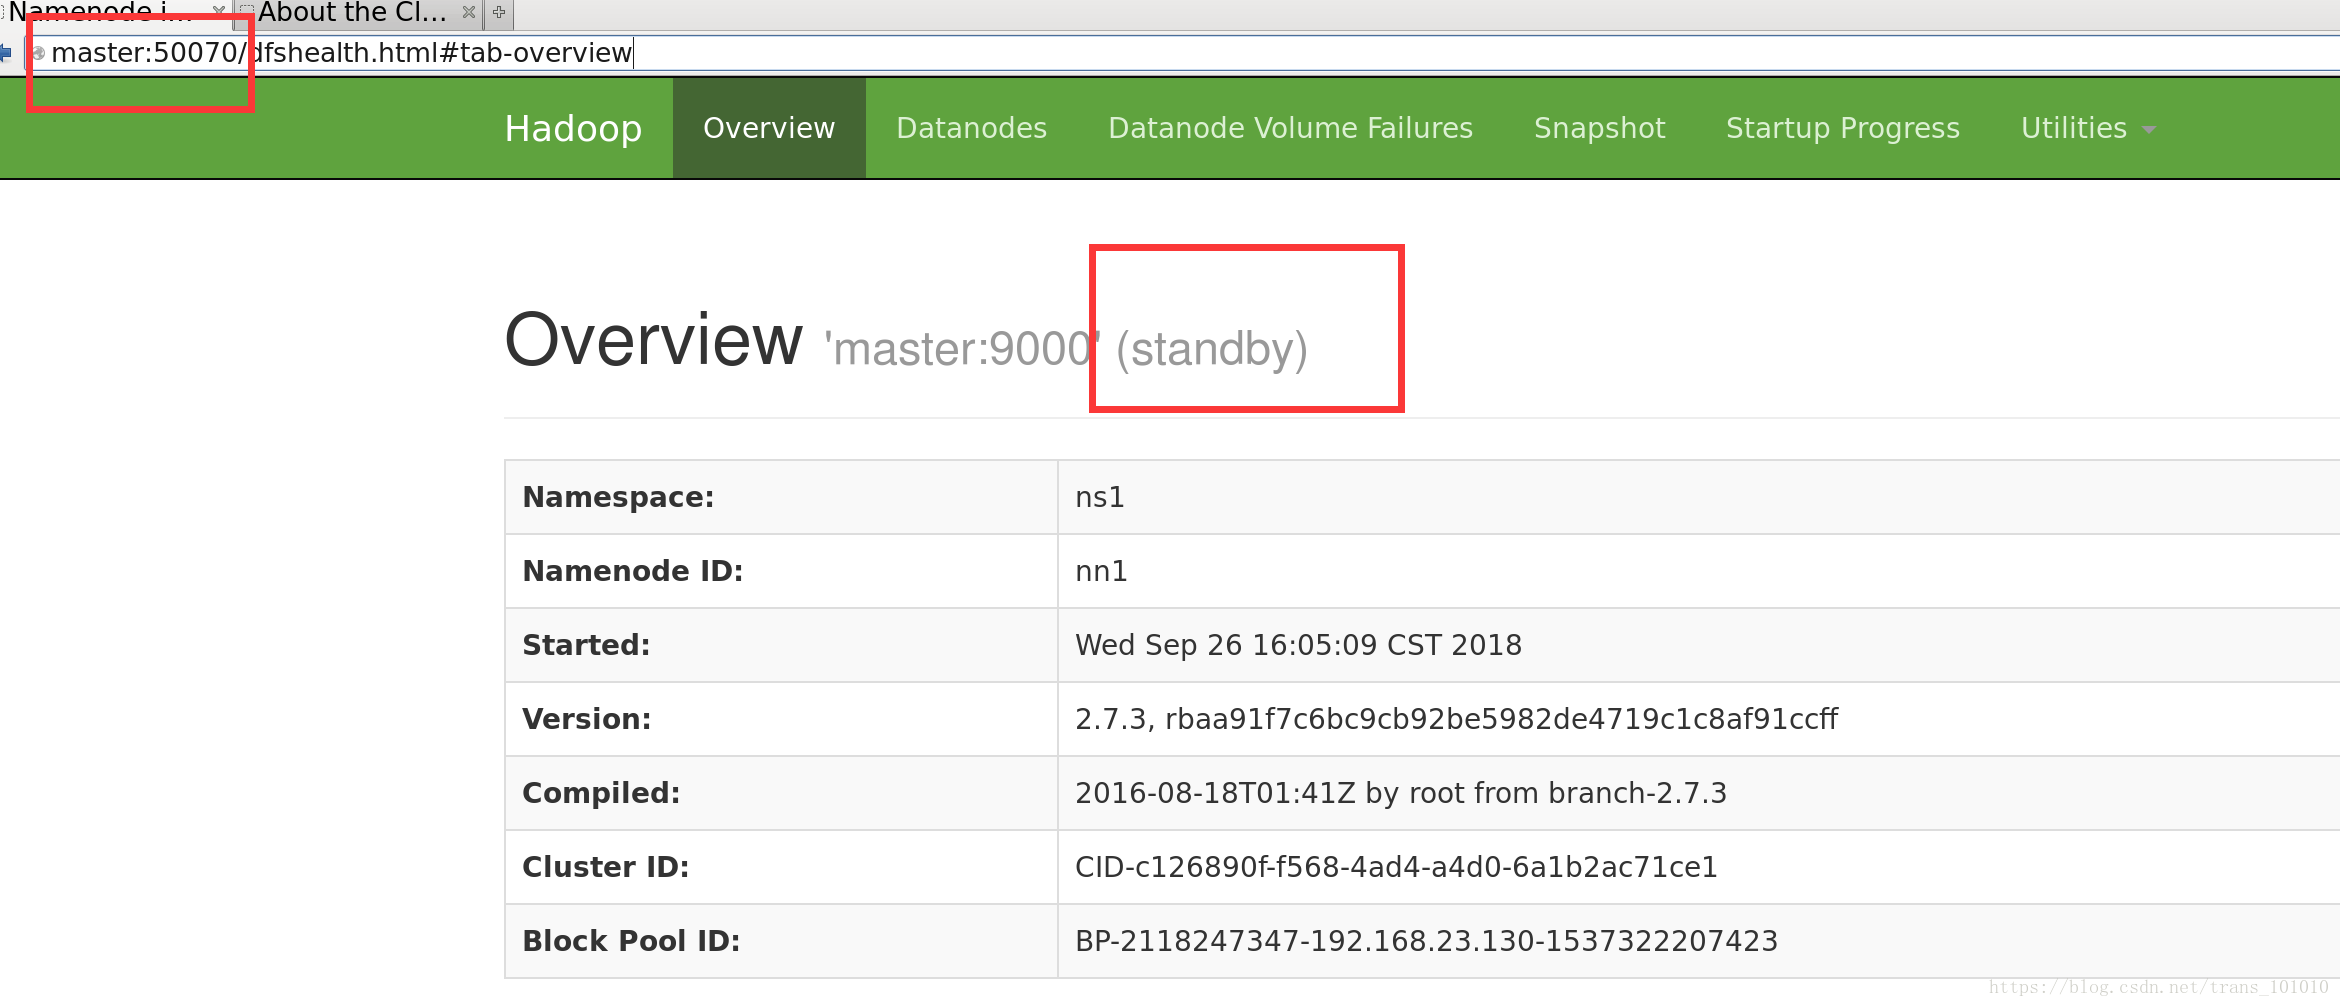
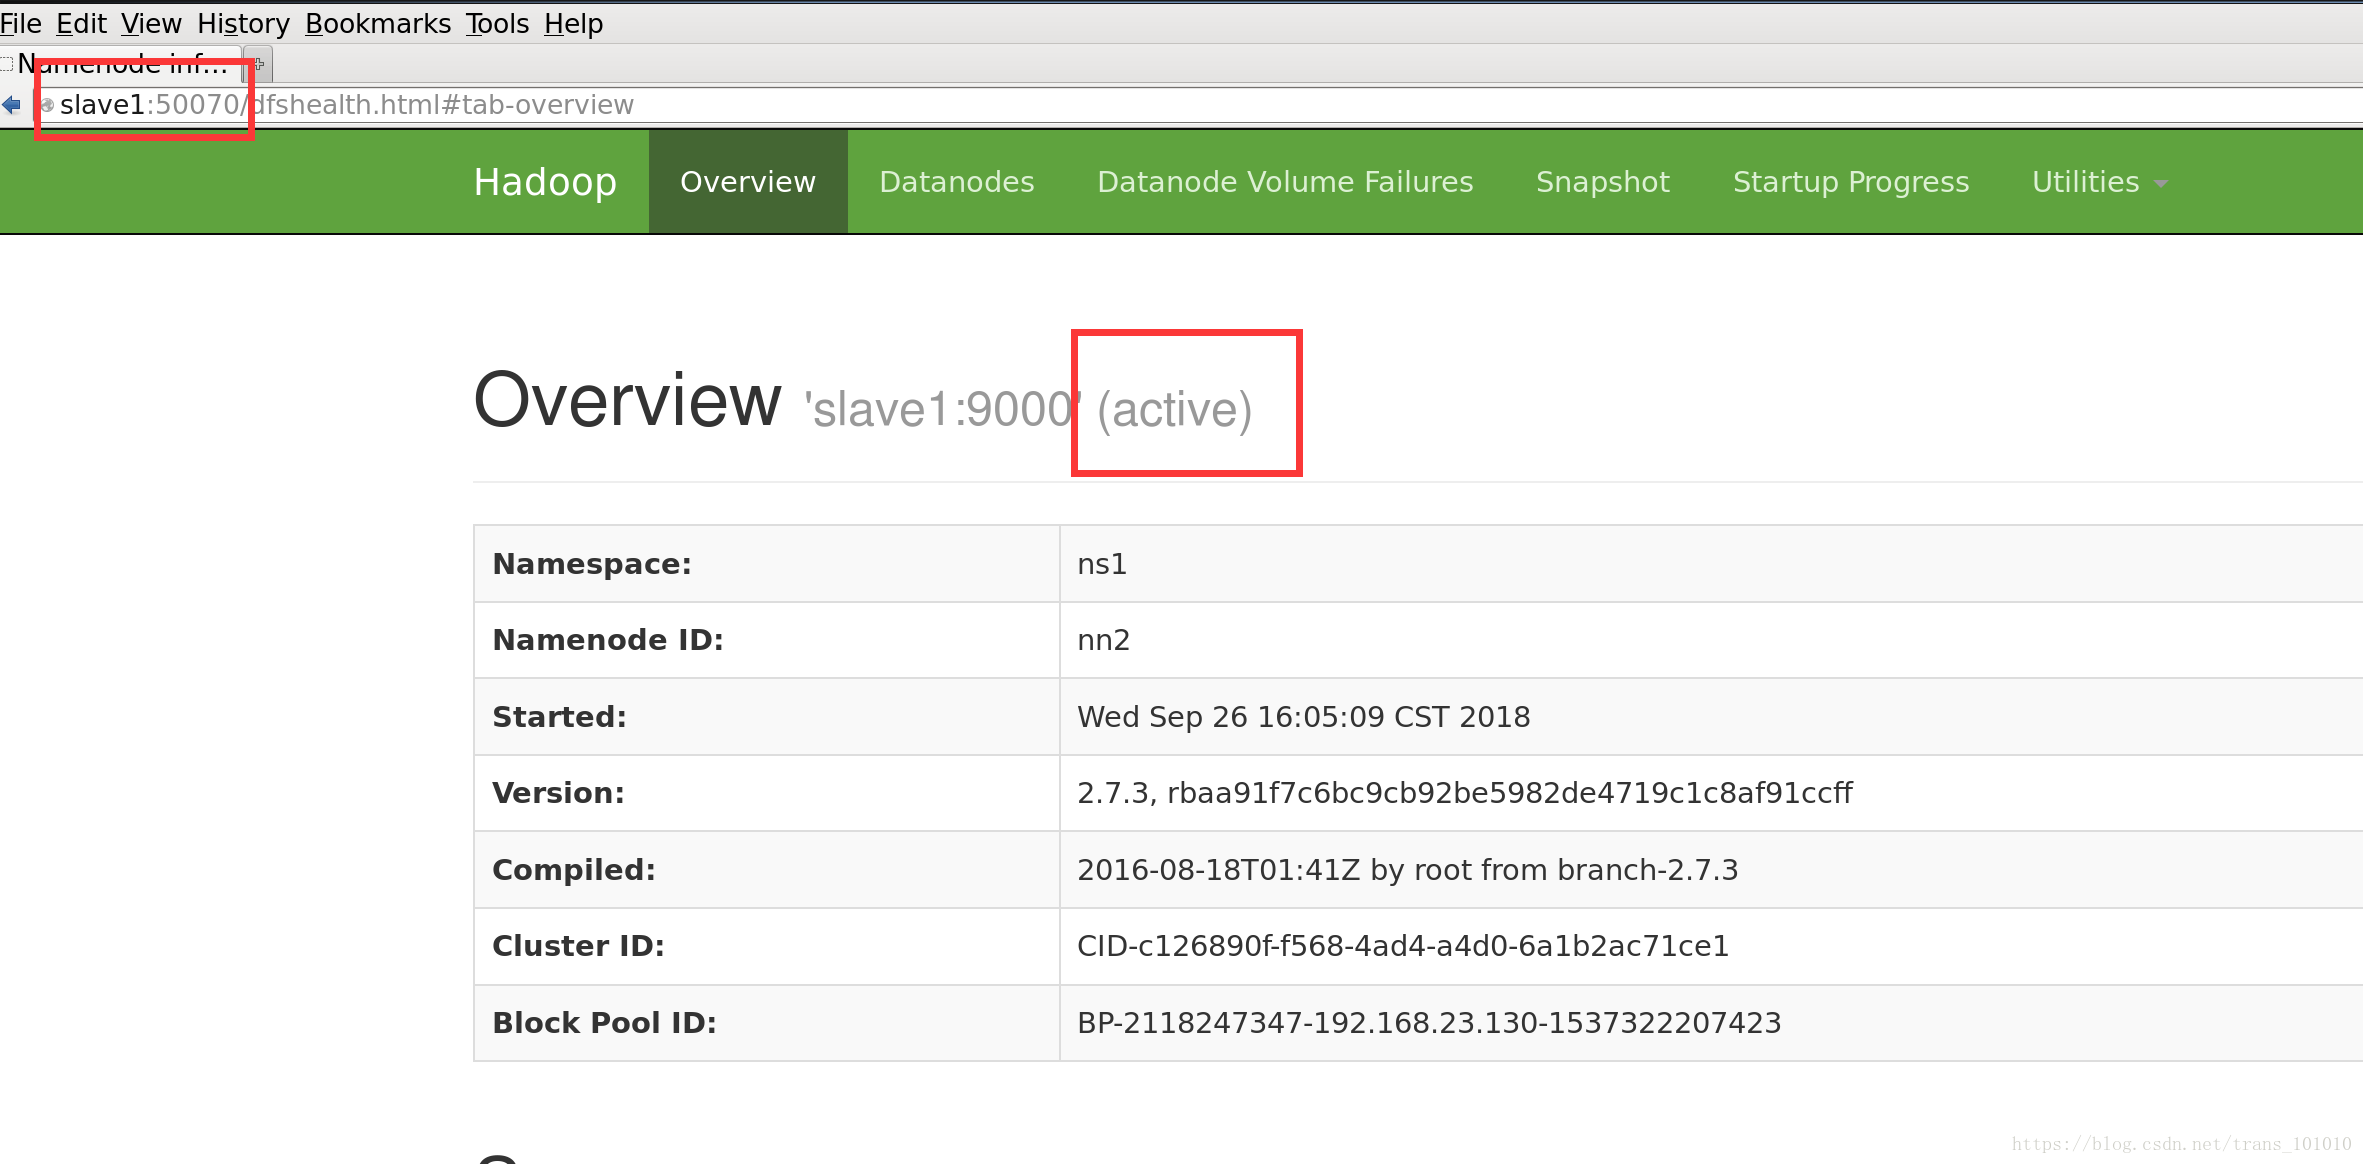
HDFS部分的HA如下
Yarn部分的HA如下
这时可以在master上杀掉NameNode进程,再查看StandbyNN是否可以自动切换到Active状态
还可以使用Hadoop自带的pi例子,在运行当中杀掉主RM来查看JOB是否可以在别一个RM中继续运行
【转】
https://blog.csdn.net/trans_1010 ... 655?utm_source=copy
作者:
不二晨
时间:
2018-10-10 13:43
奈斯
欢迎光临 黑马程序员技术交流社区 (http://bbs.itheima.com/)
黑马程序员IT技术论坛 X3.2